We are excited about our most recent release of Exelare. Not only did we squash a few bugs, but we also added some much anticipated features. We are continuing to add features and refine Exelare to provide you with the best application possible.
This latest release includes much requested integrations to the major social networking sites, fully redesigned job posting center and additional email and calendar features.
 Social Networking
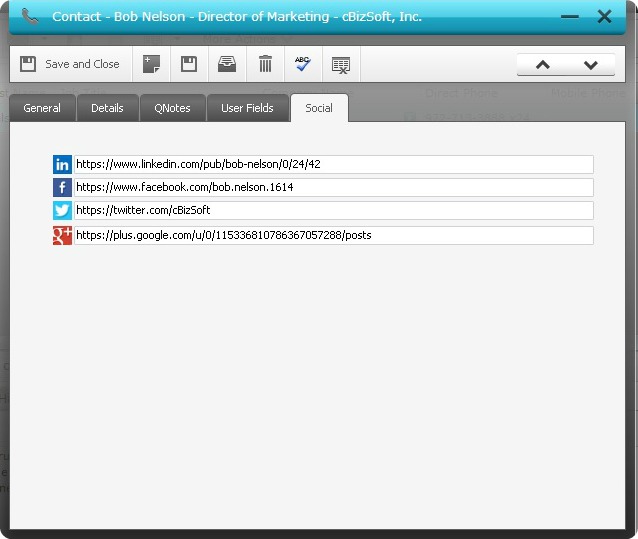
We’ve added the ability to easily link to a client or candidates’ social networking profiles within the client and candidate records. Just open a record and you’ll see a new Social Tab on the right of the record.
You’ll see icons for LinkedIn, facebook, Twitter and Google+. Just click on an icon and a new browser window will launch taking you to that site where a list of people with the same name will appear. Once you locate the right person’s page, copy their URL and paste it in the URL field next to that site’s icon in Exelare. Click save and close and then the next time you want to visit that person’s page by simply clicking the icon again.
 Job Posting
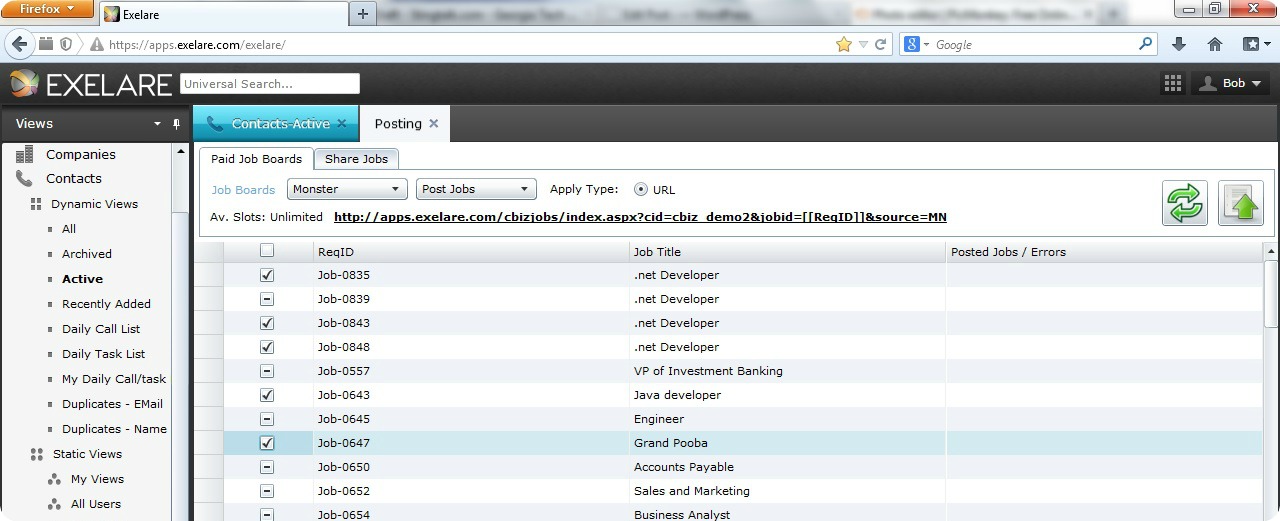
Job posting in Exelare has been completely redesigned. If you haven’t noticed already, there is a new Posting folder under Views, right below Outbox on the bottom. Click on posting to open the posting center. Within the posting center, there are two tabs; Paid Job Boards and Share Jobs.
You ‘ll need an existing paid account with a paid job board in order to post. You can post to Monster, Careerbuilder, Dice, LinkedIn Jobs and for our Aussie friends, Seek. Click on the Job Boards hyperlink to enter your job board account information. Just follow the specific instructions to enter your login information and you are all set.
So great, now you’re connected. You probably want to know how to actually post your jobs and manage them in the posting center. To post to a paid job board, click on the Paid Job Boards tab and select the site from the drop down menu. You can post select wich jobs to post by clicking in the check box to the left of the job. If you see a check mark, that job will be posted. For each site, you’ll see Av. Slots under the board you selected along with a URL. This let’s you know how many available job slots you have for that site. Once you’ve selected the jobs to post, click the Post Jobs icon in the upper right of the screen and you’re done. Your jobs won’t all post immediately. It can take up to an hour for the job to be posted, but the Refresh icon next to the Post Jobs icon will let you know the status. Just check back and refresh the view to see the progress. You can view all posted jobs by selecting Posted Jobs from the drop down menu next to the job board drop down.
Now click on the Share Jobs Tab, then the Social Networks hyperlink and add your login information for your Social Networks. Once you’ve added your login information, you’ll see all of the groups you belong to on that site. Select the group you want to post to, select the jobs you want to post and then click the Post Jobs icon. Simply repeat for each group you want to post to. Your jobs will immediately post to those groups.
 Permissions
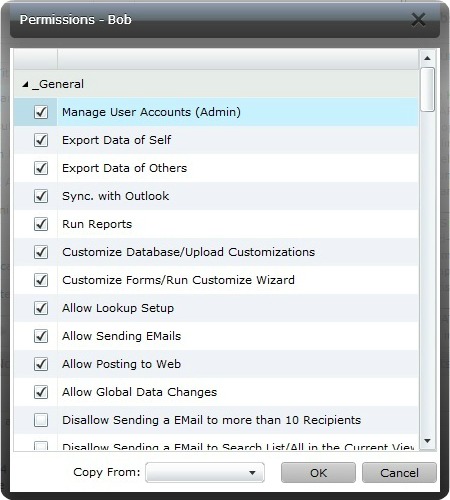
We’ve added permission setting to Exelare, giving you granular control over a user’s access to data and features. There are over 120 permissions available for each user. If you have users that will have identical permission settings, you can set the permissions one time and then copy them for each employee.
You must have Admin priviledges in order to set permissions. Click on the Tools icon next to your Account name in the upper right of Exelare. select Edit Users and click on the user name you want to set permissions for. Click Modify and then Permissions to open the list of permissions that can be set.
Once you have set permissions for a user, click OK to save them. If you want to copy those permissions to another user, simply select a user name, click Modify, then Permissions and choose which set of permissions you want to copy from the drop down at the bottom of the window.
 Allowed IP’s
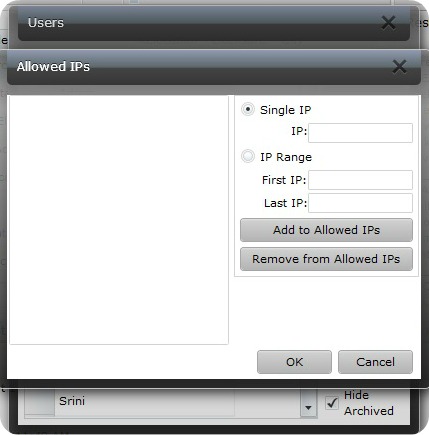
While some of our clients love that their users can lo into Exelare from anywhere, some want to limit accessibility to Exelare to one or a few locations.
You can now control where users are allowed to log into Exelare from by restricting their login to a specific IP or a range of IP’s. Click on the Tools icon next to your Account name in the upper right of Exelare. select Edit Users and click on the user name you want to enter IP information for. Click Modify and then Allowed IP’s and enter the IP information. Click on Add to Allowed IP’s to add it to that user’s allowed IP’s. Repeat until you added all or the approved locations they can login from. You can also enter a range of IP’s. If you want to remove one of the IP’s you’ve already added, click on that IP and then click on Remove from Allowed IP’s. Click OK and you’re done.
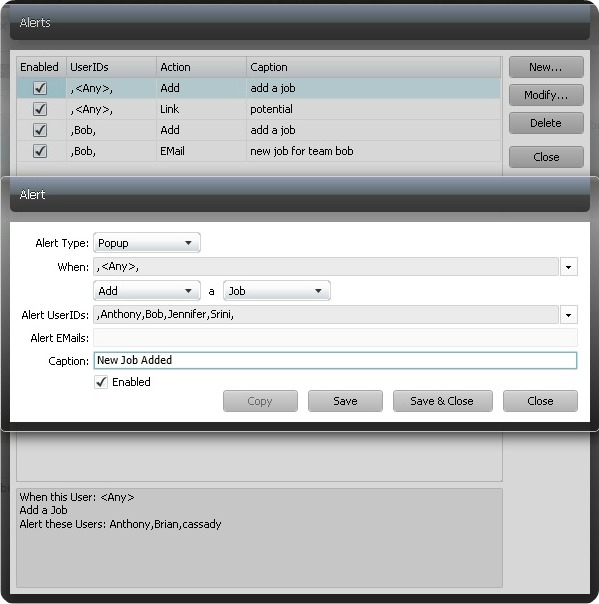 Alerts
The new Alerts feature enables users to create alerts for practically anything in Exelare. Alerts are ideal for large companies, virtual companies and companies with separate recruiting and sales roles.
The Alerts Management Engine allows you to create email or pop-up reminder alerts for almost any action taken in the system. The idea is that when one action takes place (ie: Adding a note to a Job Record, or Linking a candidate to a job), an automatic alert can be sent out to specific people or groups of people. Important: Please ensure all of your users have email addresses associated with their user account. Otherwise they will not receive alerts.
Click on the Tools icon next to your Account name in the upper right of Exelare and select Alerts. Click on ‘New’ to create a new alert, or ‘Edit’ to edit an existing alert. Follow the step by step process in the alerts setup window. The caption you enter will be the subject of the alert that is sent. Alert emails can be any email address you want. This option only works when you select Email or Both Email and Popup from the Alert Type drop down when creating the alert. Uncheck the Enabled box if you want to keep the alert, but turn it off for the time being.
New Calendar Features
Auto Follow Up
Auto follow up gives you the ability to set the next reminder for a calendar item. Let’s say you schedule a calendar event and want to be reminded to do it again in the future. Click the new Auto Followup drop down in the calendar setting window and select from 1 day to 5 years for the next reminder to revisit that item. Not only will you get the normal reminder you set for the item, but you’ll also get a reminder the day you set the auto followup.
Show all scheduled items
Also new to the calendar item schedule window is a drop down showing all calendar items you have
scheduled for that day. This will help you see if you have any scheduling conflicts.
Taskpad
We’ve added a Taskpap to the calendar. Located on the right side of the calendar, any Task you schedule in Exelare will display in the Taskpad, while all other appointments (calls, emails, meetings, etc.) will display in the calendar.
Jump to records from calendar items
Click on a calendar item and then right click to show the available options. Select Go To and then the entity (Job, Contact, Company, Candidate) you want to jump to. Only linked entities will be available. All others will be grayed out.
New Email Features
Signatures stored in the database
Any email signatures you create in Exelare are now stored in the database and not locally. Now all of your signatures will be available to you from any PC.
Mark email as private
You will now see a Private check box at the bottom left of the Exelare email window. Check the box and that email will be viewable only by you and any other userID you select from the drop down.
Attach additional documents from a candidate record when submitting a resume
When submitting a candidate by email in Exelare, you will now see a Docs button on the right under the Signature drop down. Click Docs and a window will open displaying all attached document of that candidate. Simply check the documents you want to attach and not only will you submit the resume, but any associated documents you wish to send.
Read receipt, read request and mail priority
When sending an email in Exelare, click on Option in the mail window and you can mark the mail as high priority, request an read receipt and a read request.
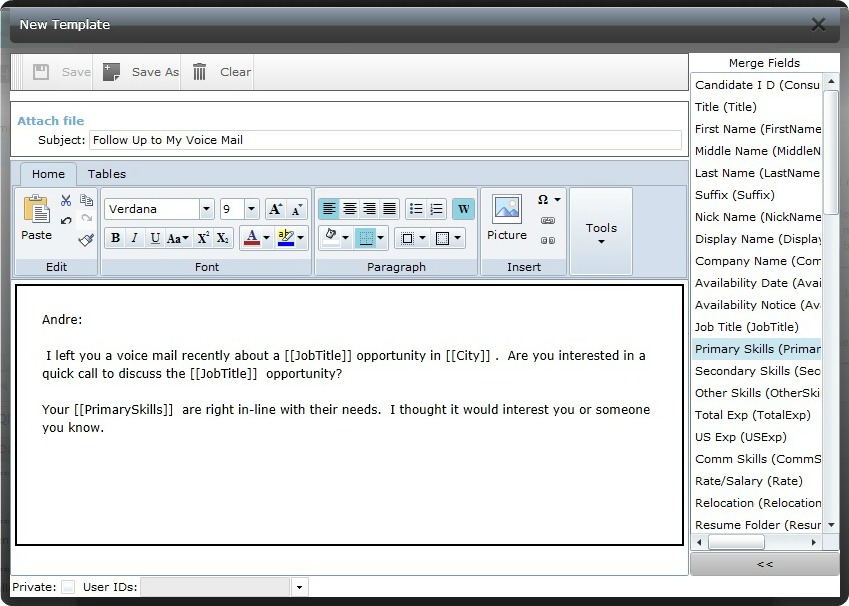 Email templates and merge field emails
To create a new email template, open a new email window, click Styles at the top, then select Templates and select New. New Template Data can be inserted into a template by typing or copying and pasting from another source. Click Save As, name the template and the template is saved for future use.
You’ll notice that when you choose to create a new template or edit an existing template, a sidebar opens on the right of the email window. This merge fields tool is useful in creating templates that will pull data from a record and insert it in the email body.
To use the merge fields tool, create a new template or edit an existing one. Type in the email body as you normally would and insert merge fields from the list on the right by selecting a database field and then clicking the double arrow icon at the bottom of the merge fields list. This process can be repeated as desired. When the merge email is complete, click Save As, name the template and when you send the template, the data for the merge fields will fill in the placeholders.
We are continuing to improve Exelare and will be adding features in the next couple of months. If you aren’t currently using Exelare, please contact us for a demo. if you are an Exelare user and have any questions or want to schedule a training, click here.